


« Peut-on graver des dessous-de-verre au laser ? » Absolument oui !
La gravure laser sur dessous-de-verre est une activité très appréciée des créateurs européens, idéale pour créer des décorations d'intérieur personnalisées, des cadeaux attentionnés ou des articles de marque pour les petites entreprises en France, en Allemagne, en Espagne et au-delà.
Que vous soyez débutant ou que vous cherchiez à perfectionner vos compétences, ce guide axé sur le marché européen détaille tout ce que vous devez savoir : qu'est-ce que la gravure laser sur dessous-de-verre, comment cela fonctionne, les meilleurs matériaux (y compris l'ardoise sourcée en Europe), et un tutoriel étape par étape pour fabriquer vos propres dessous-de-verre en ardoise gravés au laser.

Dans cet article :
Partie 1 : Qu'est-ce que la gravure laser sur dessous-de-verre et quelle machine utiliser ?
1.1 Qu'est-ce que la gravure laser sur dessous-de-verre ?
Un dessous-de-verre est un petit accessoire plat qui protège les surfaces des tables de l'humidité et de la chaleur — généralement fabriqué en ardoise, en liège, en bois ou en métal. La gravure laser sur dessous-de-verre est une technique précise qui utilise un faisceau laser pour graver des dessins, du texte ou des motifs sur la surface d'un dessous-de-verre, créant des détails nets et durables qui rehaussent son attrait visuel. C'est la solution idéale pour fabriquer des dessous-de-verre gravés personnalisés qui se démarquent dans les foyers ou comme cadeaux uniques.
1.2 Comment le laser traite-t-il le dessous-de-verre ?
La gravure laser sur dessous-de-verre repose sur l'énergie laser focalisée pour chauffer et vaporiser la surface du dessous-de-verre, créant des marques localisées sans endommager le matériau. Pour l'ardoise (le choix le plus populaire parmi les créateurs européens), le laser crée un contraste entre les lignes gravées gris clair et la pierre sombre, offrant des résultats de gravure sur dessous-de-verre en ardoise saisissants. Le processus est contrôlé par logiciel, ce qui permet des designs complexes — des noms et dates aux logos ou motifs.

1.3 Machine de gravure laser pour dessous-de-verre :
Pour commencer à graver des dessous-de-verre au laser, vous aurez besoin d'un graveur laser. Cet appareil est essentiel au processus car il simplifie le travail et garantit des résultats précis et durables.
Face aux nombreuses machines de gravure laser disponibles, certains peuvent se demander : De quelle machine ai-je besoin pour graver un dessous-de-verre ?
En réalité, les graveurs laser à diode sont parfaitement adaptés à la gravure de dessous-de-verre domestique ou à petite échelle. Si vous recherchez la portabilité, la commodité et un bon rapport qualité-prix pour la gravure de dessous-de-verre, un graveur laser à diode est la meilleure option.

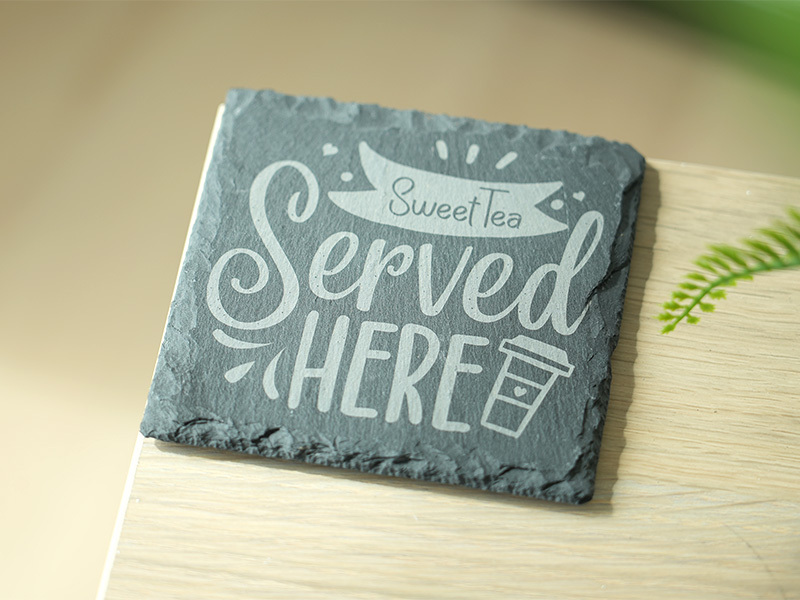
💡 Étude de cas : Fabriquer un dessous-de-verre en ardoise gravé au laser en 5 étapes
Liste de préparation pour la gravure laser d'un dessous-de-verre en pierre :
- Matériau de gravure : Feuille d'ardoise
- Machine de gravure : Graveur laser
- Design de gravure : Texte, logo, images, motifs, etc.
Peut-on graver un dessous-de-verre en ardoise au laser ? Oui ! Le processus est simple. Alors, combien de temps faut-il pour graver un dessous-de-verre en ardoise ? Ne vous inquiétez pas, suivez simplement ces 5 étapes faciles pour obtenir votre dessous-de-verre en ardoise gravé au laser en quelques minutes !
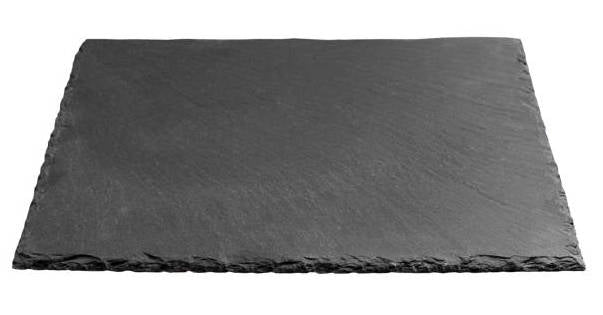
Étape 1 : Choisissez votre matériau - Feuille d'ardoise
Le choix du bon matériau est crucial pour la gravure laser sur dessous-de-verre en ardoise. Différents matériaux nécessitent des réglages laser spécifiques pour garantir une gravure précise. De plus, n'oubliez pas qu'il est important de s'assurer que le matériau du dessous-de-verre est compatible avec le laser afin d'éviter tout risque potentiel pour la sécurité.
Dans ce guide, nous utiliserons une étude de cas pour graver une feuille d'ardoise !
Étape 2 : Choisissez la bonne machine de gravure laser pour dessous-de-verre en ardoise
Ici, nous recommandons le LaserPecker 5 (LP5). Le LP5 est un graveur double laser et multifonctionnel qui non seulement offre d'excellents résultats sur les surfaces en ardoise, mais peut également graver profondément dans la pierre. Grâce à la fonction de gaufrage du LP5, vous pouvez même créer de superbes effets 3D sur l'ardoise ou le bois.
*En plus du LP5, vous pouvez également choisir le LP4, le LP2 Plus, ou même le LP1 Plus. Tous offrent d'excellentes performances pour la gravure de dessous-de-verre.
Gravure de dessous-de-verre en ardoise avec le LaserPecker LP3
Gravure de dessous-de-verre en liège avec le LaserPecker LP2
Notes de sécurité :
Pour les utilisateurs à travers l'Europe, la sécurité doit toujours être la priorité lors de la gravure laser sur dessous-de-verre en ardoise ou tout autre matériau.
- Utilisateurs LP2 Plus, LP2 et LP4 : Nous recommandons d'associer votre machine au caisson standard LaserPecker lors d'une utilisation à domicile ou en atelier en Europe. Cet accessoire renforce la protection, complétant la conformité des machines à la sécurité laser de classe 4 selon les directives.
- Utilisateurs LP5 : Le caisson de sécurité LP5 est requis pour une protection adéquate pendant le fonctionnement. Il garantit le respect des réglementations de sécurité de l'UE, protégeant contre toute exposition accidentelle dans des environnements résidentiels ou de petites entreprises.
- Utilisateurs LX2 : Aucun caisson supplémentaire n'est nécessaire. Le LX2 est un système laser de classe 1, ce qui signifie qu'il est sûr à utiliser sans équipement de protection supplémentaire dans des conditions de fonctionnement normales.
Au-delà de la sécurité laser, la qualité de l'air est une considération clé pour les ateliers en intérieur. Le traitement laser génère des fumées et des particules fines qui peuvent affecter la santé respiratoire. Pour respecter les directives sur la qualité de l'air intérieur et maintenir un espace de travail propre et sûr, nous recommandons fortement l'utilisation du purificateur d'air de bureau LaserPecker, particulièrement pour les maisons et studios fermés ou bien isolés.
Étape 3 : Préparez votre design de gravure
Utilisez le logiciel de conception graphique LaserPecker pour créer ou importer l'image ou le motif que vous souhaitez graver sur la surface du dessous-de-verre en ardoise. Tenez compte de la taille, de la forme et des détails comme le texte ou les motifs.
Étape 4 : Configurez la machine de gravure laser pour dessous-de-verre
Premièrement, assurez-vous que votre graveur est sous tension, puis connectez-le à votre ordinateur ou appareil mobile via l'interface appropriée (USB, Bluetooth, Wifi, etc.).
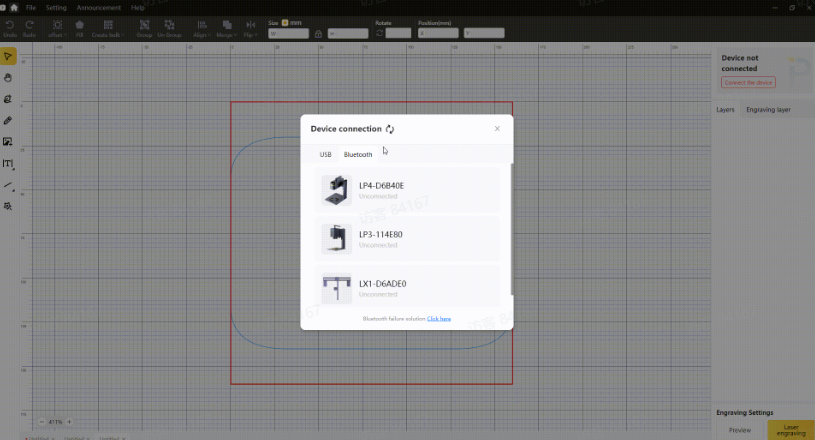
Deuxièmement, ouvrez l'application ou le logiciel de conception graphique et chargez votre design.

Troisièmement, activez le « Mode Aperçu » et assurez-vous que le laser est correctement mis au point.
Quatrièmement, vous devez placer les objets dans la zone de travail désignée et examiner l'apparence du design sur le dessous-de-verre en ardoise. S'il ne s'adapte pas correctement, vous devrez ajuster sa position et sa taille pour qu'il s'aligne avec les dimensions de votre projet.
Enfin, accédez aux réglages laser du logiciel pour ajuster les paramètres tels que la puissance, la profondeur et la résolution en fonction des propriétés du dessous-de-verre en ardoise et de la complexité du design.
Vous vous demandez peut-être : « Quelle puissance laser est nécessaire pour graver un dessous-de-verre en ardoise ? » Rassurez-vous, j'ai ce qu'il vous faut !
Pour obtenir les meilleurs résultats sur les dessous-de-verre en ardoise, nous recommandons d'utiliser les réglages LP5 suivants : laser à fibre 10W 1064nm, 100 % de puissance, 20 % de profondeur et 1 passage.
Pour explorer d'autres paramètres de gravure et de découpe recommandés par LaserPecker, reportez-vous au tableau des réglages, qui s'applique à toutes les machines LaserPecker, y compris les LP1, LP2, LP3, LP4 et autres.
Étape 5 : Commencez à graver votre dessous-de-verre au laser dès maintenant
Vérifiez tout deux fois pour éviter les erreurs. Ensuite, appuyez sur le bouton de démarrage et regardez la magie opérer. Le laser donne vie à votre design. Gardez un œil dessus, et le tour est joué !
Lors de l'utilisation d'une machine de gravure laser, il est conseillé de porter des lunettes de protection ou d'utiliser un couvercle de protection laser pour protéger vos yeux et votre corps contre les dommages potentiels, car le laser bleu peut présenter des risques.
Conclusion
La gravure laser sur dessous-de-verre est un moyen amusant et accessible pour les créateurs européens de créer des pièces personnalisées et durables — que ce soit pour la décoration intérieure, les cadeaux ou les articles de petite entreprise. Avec la bonne machine (comme le LaserPecker LP5), les bons dessous-de-verre en ardoise et le guide étape par étape ci-dessus, même les débutants peuvent maîtriser la gravure sur ardoise et produire des dessous-de-verre gravés au rendu professionnel.
La clé du succès réside dans le choix de matériaux de qualité, l'ajustement précis des paramètres et le respect des consignes de sécurité de l'UE. Que vous fabriquiez des dessous-de-verre gravés personnalisés pour un ami ou que vous marquiez des dessous-de-verre pour votre petite entreprise européenne, cette technique offre des possibilités créatives infinies partout en Europe.
Prêt à vous lancer ? Procurez-vous votre LaserPecker LP5 via la boutique LaserPecker UE, trouvez des dessous-de-verre en ardoise auprès de fournisseurs locaux, et laissez briller votre créativité !


