


Rubber band guns are a fun woodworking project for DIY enthusiasts, students, and hobby makers across Europe. While traditional hand crafting is still widely used, laser cutting has become a more efficient and accurate method for creating wooden rubber band guns with professional-looking results.
But which option should you choose?
This guide compares manual crafting and laser cutting, explaining the pros, drawbacks, and practical differences between the two methods. You'll also discover why many EU makers now use laser cutting machines to create personalised rubber band gun designs with cleaner cuts, better consistency, and faster production.

In this Article:
- Part 1: Comparing Rubber Band Gun Making Methods
- Method 1: Manual Crafting
- Method 2: Laser Cutting
- Part 2: Why Laser Cutting Is the Preferred Choice for Making a Rubber Band Gun
- FAQs: Hot Questions about Making a Rubber Band Gun
Part 1: Comparing Rubber Band Gun Making Methods
There are two main ways to make a wooden rubber band gun: manual crafting and laser cutting. Traditional manual crafting focuses on hands-on building techniques, while laser cutting offers a more efficient and precise production process.
For makers, students, and hobby users across Europe, the best method usually depends on the desired finish quality, production speed, and level of customisation. Below, we compare both methods in detail, including their benefits, drawbacks, and practical building steps.
Method 1: Make a Wooden Rubber Band Gun via Manual Crafting
Manual crafting is a classic DIY method that involves cutting, shaping, sanding, and assembling each component by hand using simple tools.
Many hobby makers prefer this approach because it allows for greater personal involvement throughout the building process. It is also a good entry-level option for people interested in learning basic woodworking techniques.
Pros of Manual Crafting
- Creates a more interactive and hands-on building experience
- Requires only simple tools and accessible materials
- Allows flexible design adjustments during assembly
- Suitable for small DIY projects and educational activities
Cons of Manual Crafting
- Lower precision and less consistency between parts
- Slower production process due to manual work
- More sanding and finishing may be required
- Can be difficult for beginners without crafting experience
Step-by-Step Manual Crafting Process
1. Prepare Materials and Tools
Select suitable materials such as plywood, softwood, or thick cardboard. Prepare tools including:
- Scissors
- A small hand saw
- Sandpaper
- Glue
- Measuring tools
2. Create or Print a Template
Draw the design manually or print a template and place it carefully onto the material surface.
3. Cut the Components by Hand
Follow the template lines carefully to cut out each section of the rubber band gun.
4. Sand the Edges
Smooth all rough edges and surfaces to improve assembly accuracy and overall appearance.
5. Assemble the Structure
Connect all components in the correct sequence to build the main frame.
6. Install and Test the Rubber Band Mechanism
Attach the rubber band mechanism and test the firing action to ensure smooth operation.
Method 2: Make a Wooden Rubber Band Gun via Laser Cutting
Laser cutting is a modern manufacturing method that uses a diode laser cutter like LaserPecker LX2 to cut highly precise shapes from digital design files. Compared to manual crafting, this process delivers cleaner edges, improved consistency, and much faster production.
Across the EU, many hobby workshops and small business creators use laser cutting to produce personalised wooden projects with professional-quality results.
Besides cutting, laser machines can also engrave decorative patterns, names, logos, or textures directly onto the surface. This allows makers to create unique rubber band gun designs without additional finishing tools.
Pros of Laser Cutting
- Highly precise cuts for accurate assembly
- Faster and more efficient production
- Smooth edges with little post-processing required
- Excellent for repeatable builds and batch projects
- Supports engraving and personalised designs
Cons of Laser Cutting
- Requires a laser cutting machine
- Digital design preparation is necessary
- Less traditional hands-on crafting involvement
- Higher initial setup costs
Step-by-Step Laser Cutting Process
1. Create the Digital Design
Use vector software such as Adobe Illustrator or Inkscape to design all components.
2. Prepare the Laser Cutting File
Adjust dimensions and export the design in a format supported by the laser cutter.
3. Select the Material
Popular materials include:
- Plywood
- MDF
- Acrylic
In many EU maker spaces, plywood remains one of the most commonly used materials because of its balance between affordability and engraving quality.
4. Cut the Components with the Diode Laser Cutter
Load the design file into the diode laser cutter and cut all parts with consistent precision.
5. Remove and Sort the Pieces
Carefully remove the finished components and organise them before assembly.
6. Assemble and Personalise the Build
Assemble the structure and optionally engrave custom text or decorative details onto the surface.
Key Differences Between Manual Crafting and Laser Cutting
| Manual Crafting | Laser Cutting | |
|---|---|---|
| Tools Required | Basic hand tools such as saws and sandpaper | Diode laser cutter and design software |
| Precision | Depends heavily on manual skill | Highly accurate and consistent |
| Time Required | Slower due to manual cutting and sanding | Much faster once files are prepared |
| Time Required | Slower due to manual cutting and sanding | Much faster once files are prepared |
| Difficulty Level | Easier to start but requires patience | Requires basic software and machine knowledge |
| Finish Quality | Rougher edges that often need sanding | Clean edges with minimal post-processing |
| Finish Quality | Rougher edges that often need sanding | Clean edges with minimal post-processing |
| Best For | DIY learning and casual crafting | Professional-looking and repeatable builds |
Part 2: Why Laser Cutting Is the Preferred Choice for Making a Rubber Band Gun
Why Laser Cutting Is Ideal for Rubber Band Gun Projects?
Laser cutting is highly suitable for wooden rubber band gun projects because these builds often require accurate trigger mechanisms, layered assemblies, and precisely aligned components. Compared with manual crafting, laser cutting delivers cleaner cuts, greater consistency, and a more efficient production process.
With a diode laser cutter, makers can produce detailed components directly from a digital design file, reducing manual errors and simplifying assembly. This makes laser cutting especially useful for hobby workshops, schools, and small-scale creators across Europe.
Main Benefits of Laser Cutting for Rubber Band Guns
- Accurate parts fit together with minimal sanding required
- Intricate shapes and trigger systems can be cut precisely
- Multiple identical kits can be produced efficiently
- Engraving and cutting can be completed within the same workflow
- Produces cleaner and more professional-looking results
For EU makers who value repeatability, efficiency, and customisation, laser cutting offers a reliable alternative to traditional manual methods.

Source: LaserPecker User Group
Recommended Diode Laser Cutter for Rubber Band Gun Projects – LaserPecker LX2
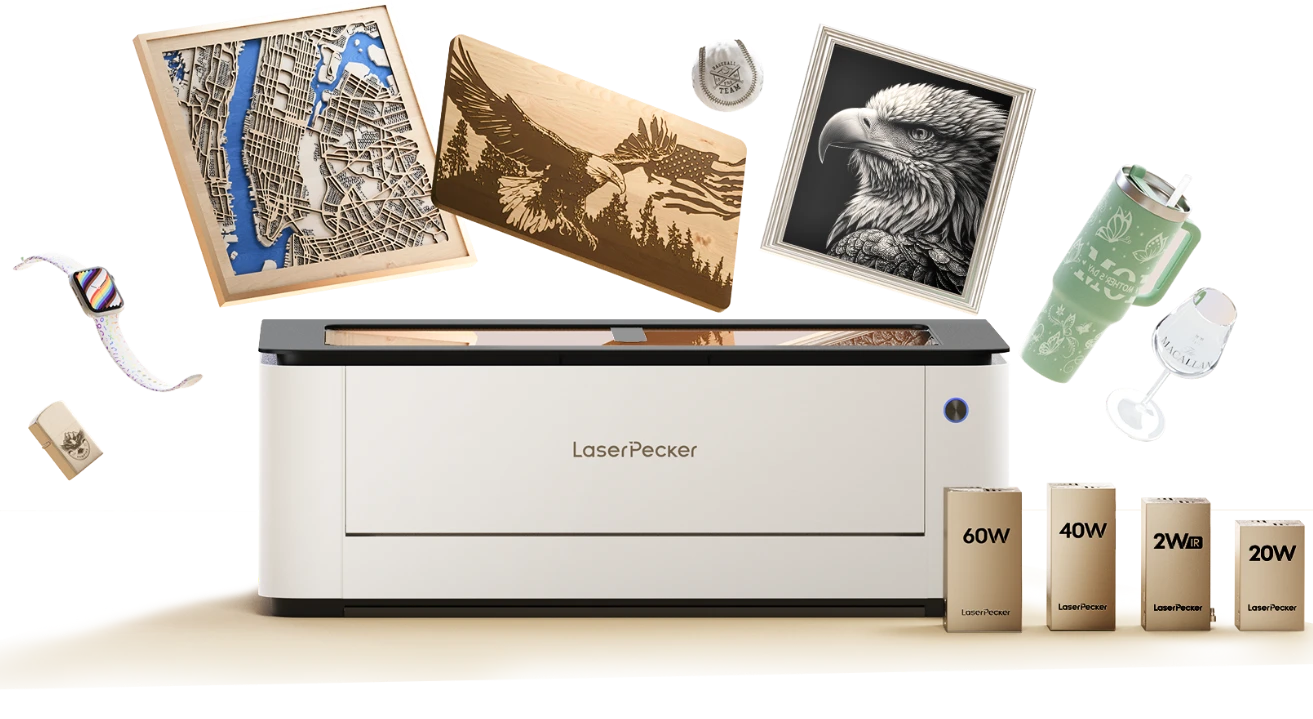
The LaserPecker LX2 is particularly well suited for rubber band gun projects thanks to its precise cutting performance, engraving flexibility, and compact workspace design.
It supports both cutting and engraving in one workflow, allowing users to create personalised wooden rubber band gun designs with accurate assembly and decorative detailing.
1. Fast and Precise Cutting
With cutting speeds of up to 1000 mm/s, the LX2 can produce detailed wooden components quickly while maintaining smooth edges and accurate dimensions.
This is especially useful for makers creating repeatable project kits or testing multiple design prototypes.
2. Multiple Laser Module Options
The LX2 supports several interchangeable modules, including:
- 20W diode laser
- 40W diode laser
- 60W diode laser
- 2W infrared laser module
These options allow users to process different materials and thicknesses commonly used in woodworking and maker projects.
3. Accurate Positioning Assistance
The integrated camera and alignment system help users position designs precisely on the material surface. This improves engraving accuracy and reduces material waste during production.
4. Larger Material Compatibility
Thanks to its side-opening structure, the LX2 can accommodate larger material sheets more easily. This is useful when producing multiple rubber band gun parts or larger DIY project panels.
5. Improved Indoor Safety for Home Workshops
Many EU hobby users prefer compact laser systems that are suitable for indoor use and maker spaces.
The LX2 supports Class 1 Laser Safety, making it a safer option for home workshops, classrooms, and educational environments.
For additional indoor air protection, the machine can also be paired with the LaserPecker Desktop Smoke Purifier. This system helps filter smoke, fumes, and odours generated during engraving and cutting, improving comfort and safety during long crafting sessions.
Overall, the LaserPecker LX2 offers an efficient and user-friendly solution for producing wooden rubber band gun projects with clean cuts, consistent assembly quality, and customised engraved details.
FAQs: Hot Questions about Making a Rubber Band Gun
Q1: How does a rubber band gun work?
A rubber band gun stores elastic energy when the rubber band is stretched. Once the trigger releases the band, the stored energy converts into kinetic motion, propelling the rubber band forward.
Accurate trigger alignment and smooth component movement help improve overall performance.
Q2: What determines the shooting range of a rubber band gun?
The shooting range depends on several factors, including:
- Rubber band elasticity
- Trigger release smoothness
- Precision of the assembly
- Material weight
- Alignment of the firing mechanism
Laser-cut components generally provide more consistent results because the parts fit together more accurately.
Q3: How long does it take to build a wooden rubber band gun?
Manual crafting can take several hours because all cutting, sanding, and assembly steps are completed by hand.
Using a diode laser cutter significantly reduces production time. Once the design file is ready, many makers can complete the project within approximately one hour.
Q4: Which materials work best for laser-cut rubber band guns?
Plywood is widely used because it combines durability, affordability, and good engraving performance. MDF and acrylic can also be used depending on the project design.
Thin wooden sheets are especially suitable for laser cutting because they allow precise and repeatable cuts.
Q5: Why do makers prefer laser cutting for rubber band gun projects?
Many EU hobby makers prefer laser cutting because it offers:
- Faster production
- Cleaner edges
- Higher accuracy
- Repeatable results
- Easier customisation
Laser cutting is particularly useful for projects that include detailed trigger systems or layered wooden structures.
Q6: Can beginners use a diode laser cutter for DIY projects?
Yes. Many modern diode laser cutter systems are designed to be beginner-friendly and suitable for home workshops or educational maker spaces.
Features such as camera positioning, pre-set material settings, and guided software workflows help simplify the learning process for new users.
Q7: Is laser cutting safe for indoor crafting?
When used correctly, many laser cutters are suitable for indoor use.
The LaserPecker LX2 supports Class 1 Laser Safety and can be combined with the LaserPecker Desktop Smoke Purifier to help reduce smoke, fumes, and odours during engraving and cutting.
This helps create a cleaner and more comfortable indoor crafting environment.
Q8: Can laser cutters engrave designs onto wooden rubber band guns?
Yes. In addition to cutting, laser machines can engrave:
- Names
- Logos
- Decorative textures
- Patterns
- Personalised details
This allows makers to create customised rubber band gun projects with a more professional-looking finish.
Conclusion
Making a wooden rubber band gun is a creative DIY project that combines simple mechanics, woodworking, and hands-on learning. Choosing the right production method depends on the desired finish quality, efficiency, and level of customisation.
Manual crafting remains a good option for beginners and hobby users who enjoy traditional hands-on building techniques. However, for makers seeking greater precision, cleaner assembly, and repeatable results, laser cutting provides a more advanced and efficient workflow.
A diode laser cutter such as the LaserPecker LX2 allows users to produce highly accurate parts, engrave customised details, and reduce material waste during production. Thanks to its Class 1 Laser Safety support and compatibility with the LaserPecker Desktop Smoke Purifier, the LX2 is also suitable for indoor workshops, educational environments, and maker spaces across Europe.


